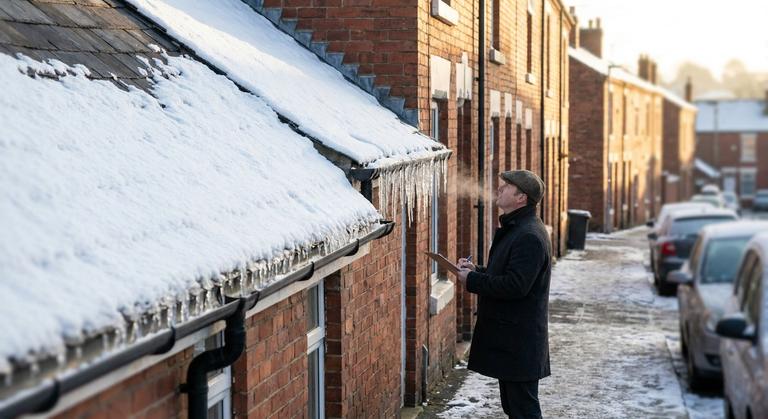
Every February, property managers across the northern half of the United States get the same call: a tenant reports a brown stain spreading across a bedroom ceiling, and there is no leak in the plumbing. The culprit is usually an ice dam, a ridge of ice along the eave that traps meltwater and forces it back under the shingles. Ice dams are among the most preventable forms of winter roof damage. Once you understand how to prevent ice dams, you can fix the root cause once instead of paying for drywall, paint, and wet insulation every spring. This guide covers why they form, what to do when one appears, and where to spend your maintenance budget for results that last.
Why Ice Dams Form
An ice dam is not really a roof problem. It is an attic problem that shows up on the roof.
Heat from the living space escapes into the attic and warms the roof deck above freezing. The bottom layer of snow melts and runs downhill beneath the snow blanket until it reaches the eave, which overhangs the exterior wall with no heated space beneath it. There the water refreezes. Each melt cycle adds a layer until a ridge forms and new meltwater pools behind it. Asphalt shingles shed water running downhill but cannot hold back standing water, so the pool works under the shingles, through the deck, and into insulation, wall cavities, and ceilings.
Sun on a dark roof adds some melting, but the main driver is heat leaking from the building. A roof that stays uniformly cold under its snow does not form dams.
The three attic failures behind almost every ice dam
Any honest answer to how to prevent ice dams starts with these three.
- Air leaks. Warm, moist air rises through gaps around attic hatches, recessed lights, plumbing and wiring penetrations, chimney chases, interior wall top plates, and bathroom fans that dump into the attic. Moving air carries far more heat than conduction through insulation, which is why sealing comes first.
- Thin or compressed insulation. Older buildings often have a few inches of loose fill that has settled, been crushed under stored boxes, or never met the recommended level for the climate zone. Gaps at the eaves, where the pitch gets tight, are common.
- Poor ventilation. Soffit vents blocked by insulation, missing rafter baffles, or no ridge or gable exhaust leaves whatever heat reaches the attic sitting against the deck.
Complex rooflines with valleys, dormers, and north-facing eaves concentrate the problem, because those spots stay shaded and collect the most runoff.
Warning Signs to Catch Early
Do not wait for a ceiling stain. Walk the exterior after the first real snowfall, when daytime temperatures hover near freezing, and look for:
- Long, thick icicles along the eaves, especially above unheated overhangs
- Bare patches on your roof while neighboring roofs stay white, which is a heat map of your air leaks
- Ice on the siding, inside soffit vents, or behind gutters
- Frost or damp spots on the underside of the sheathing inside the attic
- Peeling paint on fascia and soffits, or ceiling stains within a few feet of an exterior wall
Ask tenants to report icicles and stains in a short winter notice. A phone photo in January can save you a wall rebuild in April.
How to Prevent Ice Dams: Fix the Attic, Not the Roof
The lasting fix follows a strict order: seal, then insulate, then ventilate. Skip the first step and the other two underperform, because leaking air bypasses insulation and overwhelms ventilation.
Step 1: Air seal the attic floor
A contractor foams or caulks the penetrations listed above, weatherstrips and insulates the attic hatch, and builds airtight enclosures over recessed lights not rated for insulation contact. Chimney and flue chases need fire-rated sealant and proper clearances, so leave those to someone who knows the code. Bath and kitchen fans get rerouted outdoors, and attic ductwork gets its joints sealed with mastic. A blower door test with a thermal camera finds the leaks worth chasing.
Step 2: Bring insulation up to your climate zone target
Measure the current depth in several spots and compare it to the Department of Energy's recommended R-value for your zone. Blown-in cellulose or fiberglass fills the gap. Baffles go in at the eaves first so the new material does not block the soffit vents. If a building has older wiring such as knob-and-tube, have an electrician evaluate it before anyone buries it.
Step 3: Ventilate to keep the deck cold
Balanced intake at the soffits and exhaust at the ridge keep the underside of the roof close to outdoor temperature. Check that soffit vents are not painted shut or stuffed with old insulation. Cathedral ceilings and low-slope roofs that cannot be vented conventionally may need spray foam or dense-pack insulation directly under the deck, a contractor job with its own moisture considerations.
When you re-roof
Specify a self-adhering ice and water membrane along the eaves on the next replacement. Model building codes require it in regions with a history of ice dams, extending a set distance inside the exterior wall line, so confirm your local requirement. The membrane does not stop dams from forming, but it keeps the water they trap off the deck.
What to Do When an Ice Dam Has Already Formed
Knowing how to prevent ice dams next year does not help the tenant with water dripping onto their bed tonight. Here is what works and what backfires.
Do this:
- Use a roof rake from the ground to clear the first three to four feet above the eave after every significant snowfall. Less snow means less meltwater. Leave a thin layer rather than scraping the shingles.
- For an active leak, lay a stocking filled with calcium chloride across the dam to melt a drainage channel. It is temporary. Keep it off plants and rinse the gutters in spring.
- Call a contractor who uses low-pressure steam for stubborn dams. Steam cuts through ice without damaging shingles or flashing.
- Inside, move the tenant's belongings, catch drips, pull soaked insulation before it holds moisture against the framing, and photograph everything for your insurance carrier.
Never do this:
- Chip at the ice with a hatchet, hammer, or ice pick. Cold shingles are brittle and crack.
- Use a pressure washer or hot water from a hose. It refreezes lower down and can force its way into the wall.
- Send anyone onto a snow-covered roof.
- Treat heat cables as the fix. They keep a channel open in a troublesome valley but do nothing about the heat loss that built the dam.
A Property Manager's Ice Dam Calendar
Most ice dam damage lands on portfolios that treat winter as an emergency instead of a season. This is how to prevent ice dams at portfolio scale:
- Late summer and early fall: Schedule attic inspections on any building with a history of stains, icicles, or uneven snow melt. Insulation crews book up fast after the first cold snap, so get quotes now. Platforms like PlanaJob let PMs compare quotes from vetted contractors for air sealing and insulation, and the property manager tools keep every quote and photo attached to the building record.
- Before first snow: Clean gutters, put a roof rake in each building's maintenance closet, write roof raking into your snow contractor's scope for flagged buildings, and send tenants the winter notice.
- During winter: Walk each property after storms, keep a photo log, and put cones or signage under eaves where icicles threaten walkways. Falling ice is a liability you can manage in minutes.
- Spring: Inspect attics for wet insulation and mold, then add any new problem buildings to next fall's list.
To understand why contractors price winter emergency work the way they do, the construction business strategy blog at Construction Arbitrage is worth a read for anyone on the client side of those quotes.
The window is now. Book attic insulation and roof raking pros through PlanaJob before the first thaw-freeze cycle, while crews still have capacity. Create a free account to post your first job, and browse the PlanaJob blog for the rest of our winter maintenance guides.
FAQ
Do heat cables prevent ice dams?
No. Heat cables melt drainage channels, which reduces backup at a specific trouble spot. They do not address the heat loss that melts the snow, and they add to the electric bill every hour they run. Use them as a stopgap on a valley or north-facing eave while you plan the attic work.
Will cleaning the gutters stop ice dams?
Not on its own. Ice dams form on roofs with no gutters at all, because the eave is cold regardless. Clogged gutters make things worse by holding ice at the edge and adding weight that can tear them loose. Keep them clean, but the real answer to how to prevent ice dams is in the attic.
Who pays for ice dam damage in a rental?
The owner is generally responsible for the roof and structure, so ice dam repairs and the resulting ceiling or wall damage fall on the landlord. Check the lease and your insurance policy, since coverage for repairs and for removing the dam itself varies between carriers. Tenants should report early signs, which is why the winter notice matters.